05 Jul How to Connect AirPods to MacBook
AirPods aren’t limited only to your iPhone; you can connect them with your Mac as well. After all, they are a fancy version of your normal Bluetooth earbuds. Interestingly, if your AirPods are connected to your iPhone, they are automatically connected with your Mac. However, if that’s not the case, you can still connect them with your Apple computer.
In this tutorial, we’ll help you know how to connect AirPods to MacBook differently in two cases, i.e. if they are already connected with your iPhone and if they are not.
Scenario #1
Connecting your AirPods with Mac if you already have them on your iPhone
Provided both the Apple ID logged in on your Mac and iPhone are the same, your AirPods will automatically be connected with your Mac if you are already using them on your iPhone.
You can do the task in the following manner:
- Just, as usual, open the AirPods case without removing the AirPods from the case
- Head to your Mac and access the menu bar located on the top of the home screen
- Click the Volume icon resembling that of a speaker icon
- On this menu, access the Output Device section
- Click AirPods
This should connect your AirPods with your Mac. Sometimes, you need to tweak more settings to make it work. These are the steps:
- On the home screen, head to the menu bar
- Select the Apple icon and access System Preferences
- Here, you need to ensure that your Apple ID logged in on this Mac is the same as your Apple ID logged in on your iPhone
- Click Apple ID in the System Preferences window
- Once you confirm the Apple ID, you need to enable Handoff if it is not
- So, in the same System Preferences window, head to General and confirm whether the checkbox of the option “Allow Handoff between this Mac and your iCloud devices” is enabled. If it’s not, you need to do it
- You can also enable the volume of your AirPods from the same window. In case, you can’t see the volume icon in the top bar called menu bar, you need to head to the Sound section of the System Preferences window and enable the option “Show volume in menu bar”
These are the steps to follow to connect your AirPods with your Mac if you are using the earbuds on your iPhone too. But what about the other case when the AirPods are never enabled on your iPhone before?
Scenario #2
Connecting your AirPods with Mac if you don’t access them on your iPhone
Sometimes, the new AirPods you’re using or the ones that you temporarily borrowed from your friend need to be used on your Mac. Since you don’t have them connected on your iPhone (using the same Apple ID), the steps given above won’t be enough.
In this situation, you can follow these steps to connect the AirPods with your Mac:
- Open the AirPods case just as mentioned above
- Access the back of the case and long-press the button situated there for a few seconds until the status light starts flashing
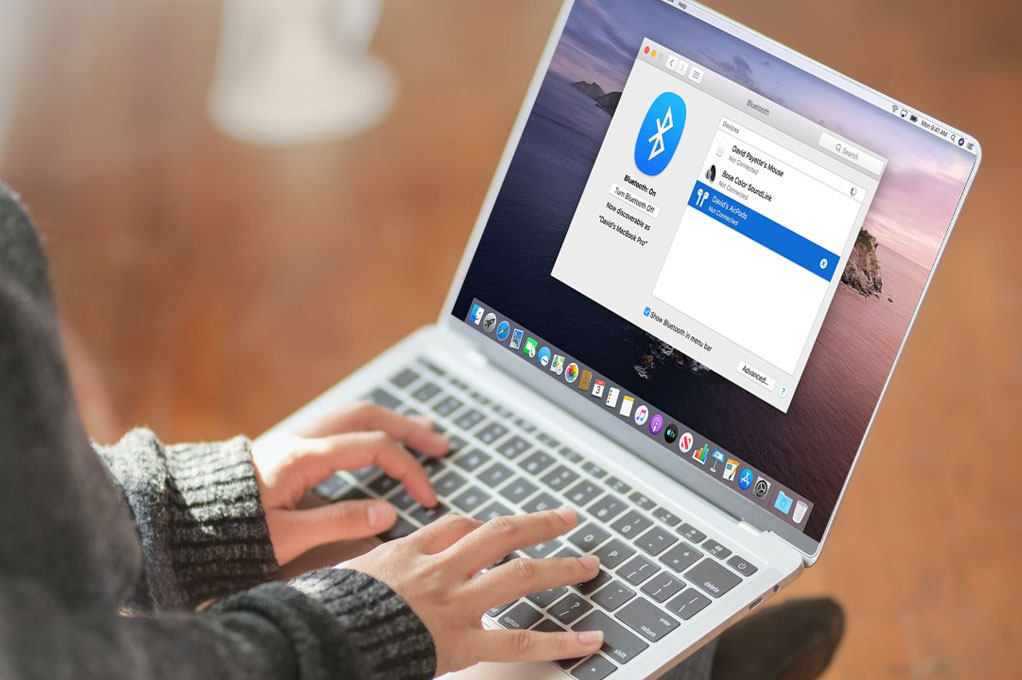
- Now, head to your Mac and select the Apple icon
- Click System Preferences
- When the window opens, select Bluetooth
- Check the device list and select the AirPods of your choice
- Click Connect
Once the connection between your AirPods and Mac establishes, you will see the name of the AirPods on the top rank of this list, ready to use.
In case, there occur issues in connecting your AirPods, you can tweak these settings as well:
- In any case, you always need to be sure that your software is updated. The versions which are compatible with your AirPods generation
- When your AirPods don’t connect even after appearing on the Device list of Bluetooth section, you need to remove and enable them on the list
- As your last resort, you can reset the AirPods and try connecting them again. Resetting the AirPods takes you through a process of pressing and holding the button situated on the AirPods case backside for at least seconds until the status light starts turning amber
All these ways are helpful in making the connection between your AirPods and Mac easy. Always remember to keep the devices clean and dirt-free for a good experience.
No Comments